
Step
1、Install Windows ADK
You can download the tool from the URL:
How to setup it, please reference following:
Step
2、To use Windows®
System Image Manager (Windows SIM) creates an answer file
1、To get the Windows
image file
- copy ” install.wim” from Windows Embedded Industry 8.1 OPK DVD,the path is \sources\install.wim

- copy ” install.wim” to any directory path on your technician computer.


- On the File menu, click Select Windows Image.

- browse to a Windows image file


- Select what version OS you want to create a answer file.

l Click “yes”. Don’t care the notification message.
Because
the catalog file (.clg) has not been created, it will be created later.
- Click “yes”. Don’t care the notification message

- Windows SIM prompts you to create the catalog file.

- The catalog will show on Windows SIM.

- You can see the catalog file (.clg) Windows SIM created.

Note:If you direct load the “install.wim” from DVD,
you will see the error message. Because of the catalog file would not be
created to DVD.

4、To create a new
answer file
- On the File menu, click New Answer File.

- In the Answer File pane, you will see some contents in answer file.

Step
3、Configure
Components and Settings in an Answer File
1、Add Sysprep component and
Configure it
- Select Sysprep component and click it to add to answer file

- Configure Sysprep component

2、Add Microsoft-Windows-Shell-Setup
component to Pass 4 specialize(4),then Configure it
- Add Microsoft-Windows-Shell-Setup component

- Set PID.

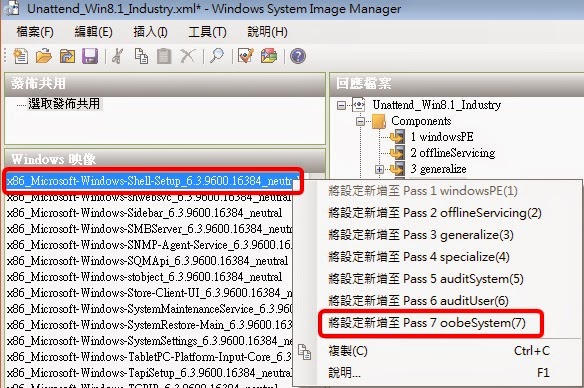
3、Add
Microsoft-Windows-Shell-Setup component to Pass 7 oobeSystem(7),then Configure
it
- Add Microsoft-Windows-Shell-Setup component
- Set Registered Organization name

Step
4、Save the
answer file
l On the File menu, click Save Answer File.

- Give a path and file name to save the answer file.

Step 5、Open notepad.exe and
Write a bath file to run the sysprep.exe to clone, then save as “Win8.1_Industry_SYSPREP.BAT”
The content as follows:
< sysprep.exe path> /generalize /oobe /shutdown /unattend:<unattend
file path>
For
wxample:
Step 6、To run sysprep.exe
to clone your OS.
1、To copy your
unattend file (answer file) and bath file to the path on the same directory
with sysprep.exe.
- Find the sysprep.exe on the path, c:\windows\system32\sysprep

- Copy your unattend file (answer file) and bath file to the path on the same directory with sysprep.exe.


沒有留言:
張貼留言