在參考微軟的官方blog
Windows 7 對固態硬碟 (SSD) 的支援與常見問題集
我們可以歸納在使用SSD有以下幾項注意事項:
1、trim是否enable
2、Prefetcher是否disable
3、Superfetch是否disable
4、disk defragmentation是否disable
以下的步驟將示範如何建立一個自動建置以上設定的answer file,並且搭配sysprep執行。
1、建立sysprep的answer file
使用ADK的Windows System Image Manager,在Synchronous Command指定"Pass 4 specialize"。
a、設定enableTrim,在Synchronous Command對話視窗中輸入以下指令:
fsutil behavior set disabledeletenotify 0
Note:在Windows System Image Manager的answer file會自動產生以下的設定。
b、disable Prefetcher,在Synchronous Command對話視窗中輸入以下指令:
"HKLM\SYSTEM\CurrentControlSet\Control\Session Manager\Memory Management\PrefetchParameters" /v EnablePrefetcher /t REG_DWORD /d 0 /f
c、disable Superfetch,在Synchronous Command對話視窗中輸入以下指令:
reg add "HKLM\SYSTEM\CurrentControlSet\Control\Session Manager\Memory Management\PrefetchParameters" /v EnableSuperfetch /t REG_DWORD /d 0 /f
d、Disable Background disk defragmentation,在Synchronous Command對話視窗中輸入以下指令:
reg add "HKLM\SOFTWARE\Microsoft\Dfrg\BootOptimizeFunction" /v Enable /t REG_SZ /d N /f
e、Disable Background auto-layout,在Synchronous Command對話視窗中輸入以下指令:
reg add "HKLM\SOFTWARE\Microsoft\Windows\CurrentVersion\OptimalLayout" /v EnableAutoLayout /t REG_DWORD /d 0 /f
Note:所有的Synchronous Command都輸入後,在Windows System Image Manager的answer file會自動產生以下的設定。
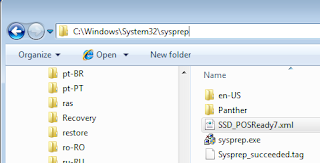
2、將answer file儲存於C:\Windows\System32\sysprep,並且命名為SSD_POSReady7.xml。
Note:SSD_POSReady7.xml內容如下
<?xml version="1.0" encoding="utf-8"?>
<unattend xmlns="urn:schemas-microsoft-com:unattend">
<settings pass="specialize">
<component name="Microsoft-Windows-Deployment" processorArchitecture="x86" publicKeyToken="31bf3856ad364e35" language="neutral" versionScope="nonSxS" xmlns:wcm="http://schemas.microsoft.com/WMIConfig/2002/State" xmlns:xsi="http://www.w3.org/2001/XMLSchema-instance">
<RunSynchronous>
<RunSynchronousCommand wcm:action="add">
<Order>1</Order>
<Path>fsutil behavior set disabledeletenotify 0</Path>
</RunSynchronousCommand>
<RunSynchronousCommand wcm:action="add">
<Order>2</Order>
<Path>reg add "HKLM\SYSTEM\CurrentControlSet\Control\Session Manager\Memory Management\PrefetchParameters" /v EnablePrefetcher /t REG_DWORD /d 0 /f</Path>
</RunSynchronousCommand>
<RunSynchronousCommand wcm:action="add">
<Order>3</Order>
<Path>reg add "HKLM\SYSTEM\CurrentControlSet\Control\Session Manager\Memory Management\PrefetchParameters" /v EnableSuperfetch /t REG_DWORD /d 0 /f</Path>
</RunSynchronousCommand>
<RunSynchronousCommand wcm:action="add">
<Order>4</Order>
<Path>reg add "HKLM\SOFTWARE\Microsoft\Dfrg\BootOptimizeFunction" /v Enable /t REG_SZ /d N /f</Path>
</RunSynchronousCommand>
<RunSynchronousCommand wcm:action="add">
<Order>5</Order>
<Path>reg add "HKLM\SOFTWARE\Microsoft\Windows\CurrentVersion\OptimalLayout" /v EnableAutoLayout /t REG_DWORD /d 0 /f</Path>
</RunSynchronousCommand>
</RunSynchronous>
</component>
</settings>
<cpi:offlineImage cpi:source="catalog:e:/posready7/posready 7.clg" xmlns:cpi="urn:schemas-microsoft-com:cpi" />
</unattend>
Note:如果為測試的product key,不想sysprep受到只能做三次generalize的限制,須設定SkipRearm=1
<RunSynchronousCommand wcm:action="add">
<Order>6</Order>
<Path>reg add "HKLM\SOFTWARE\Microsoft\Windows NT\CurrentVersion\SoftwareProtectionPlatform" /v SkipRearm /t REG_DWORD /d 1 /f</Path>
</RunSynchronousCommand>
3、開始封裝OS
執行sysprep /generalize /oobe /reboot /unattend:c:\Windows\System32\sysprep\SSD_POSReady7.xml
Note:開始封裝
4、檢驗結果
在做完sysprep後,開機登入後
a、檢驗trim的狀態,在command prompt執行fsutil behavior query disabledeletenotify,顯示trim為enable(disabledeletenotify=0)。
b、執行regedit.exe,檢查是否disable Prefetcher
c、執行regedit.exe,檢查是否disable Superfetch
d、執行regedit.exe,檢查是否Disable Background disk defragmentation
e、執行regedit.exe,檢查是否Disable Background auto-layout


沒有留言:
張貼留言